We want to hear from you! Help us gain insights into the state of the Ansible ecosystem.
Take the Ansible Project Survey 2024


New LibSSH Connection Plugin for Ansible Network Replaces Paramiko, Adds FIPS Mode Enablement

New LibSSH Connection Plugin for Ansible Network Replaces Paramiko, Adds FIPS Mode Enablement

As Red Hat Ansible Automation Platform expands its footprint with a growing customer base, security continues to be an important aspect of organizations' overall strategy. Red Hat regularly reviews and enhances the foundational codebase to follow better security practices. As part of this effort, we are introducing FIPS 140-2 readiness enablement by means of a newly developed Ansible SSH connection plugin that uses the libssh library.

Ansible Network SSH Connection Basics

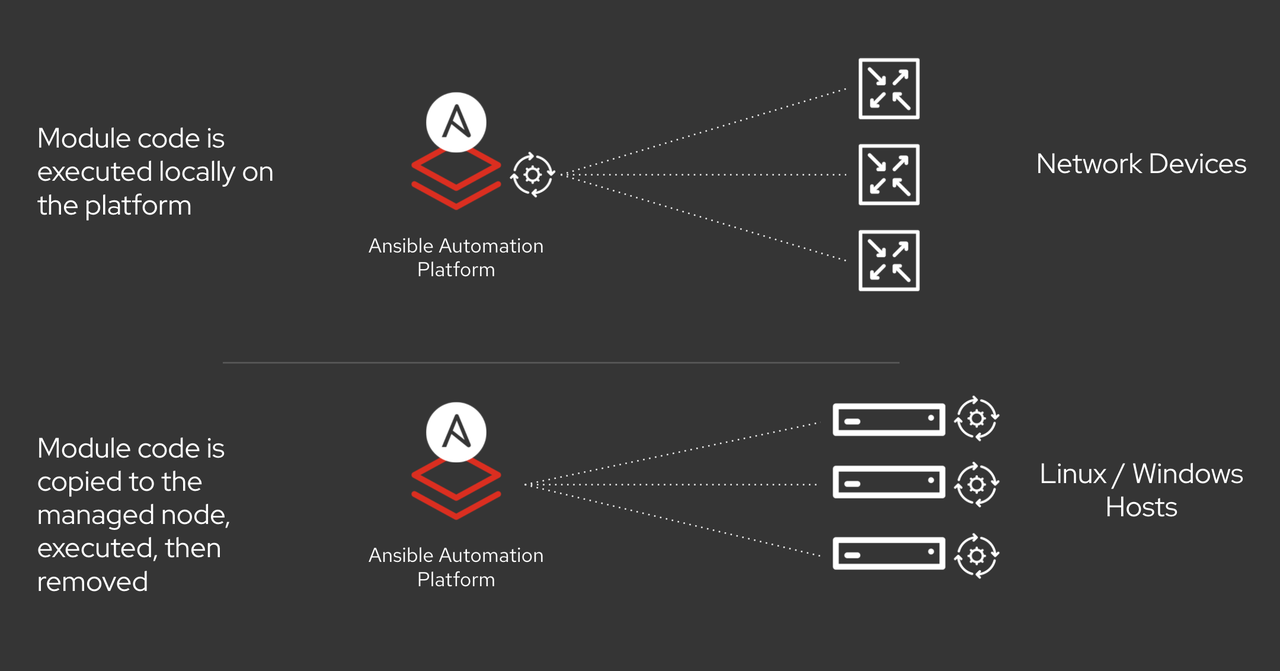
Since most network appliances don't support or have limited capability for the local execution of a third party software, the Ansible network modules are not copied to the remote host unlike linux hosts; instead, they run on the control node itself. Hence, Ansible network can't use the typical Ansible SSH connection plugin that is used with linux host. Furthermore, due to this behavior, performance of the underlying SSH subsystem is critical. Not only is the new LibSSH connection plugin enabling FIPS readiness, but it was also designed to be more performant than the existing Paramiko SSH subsystem.

diagram of module code execution

The top level network_cli connection plugin, provided by the ansible.netcommon Collection (specifically ansible.netcommon.network_cli), provides an SSH based connection to the network appliance. It in turn calls the ansible.builtin.paramiko_ssh connection plugin that depends on the paramiko python library to initialize the session between control node and the remote host. After that, it creates a pseudo terminal (PTY) to send commands from the control node to the network appliance and receive the responses.

Why Replace Paramiko?

The primary reason to replace the paramiko library is that it doesn't guarantee FIPS readiness and thus limits the Ansible network capability to run in environments that mandate FIPS mode to be enabled. Paramiko also isn't the speediest of connection plugins, so that can also be enhanced. Therefore, the new ansible.netcommon.libssh connection plugin can now be easily swapped in for paramiko. The ansible.netcommon Collection now contains this by default, and can be used for testing purposes until the codebase becomes more stable (it is currently Technology Preview).

Comparing the connection flow to the above, the top level network_cli connection plugin that is provided by the ansible.netcommon Collection (specifically ansible.netcommon.network_cli) still provides an SSH based connection to the network appliance. It in turn calls the ansible.netcommon.libssh connection plugin that depends on the ansible-pylibssh python library to initialize the session between control node and the remote host. This python library is essentially a cython wrapper on top of the libssh C library. It then creates pseudo terminals (PTY) over SSH using python.

Switching Ansible Playbooks to use LibSSH

With the ansible.netcommon Collection version 1.0.0, a new configuration parameter within ansible.netcommon.network_cli connection plugin was added, which allows for ssh_type be set to either libssh or paramiko

If the value of the configuration parameter is set to libssh, it will use the ansible.netcommon.libssh connection plugin, which in turn uses the ansible-pylibssh python library that supports FIPS readiness. If the value is set to paramiko, it will continue to use the default ansible.builtin.paramiko connection plugin that relies on the paramiko python library. 

Again, the default value is set to paramiko, but in the future plans are to change the default to libssh.

Installing and Configuring LibSSH

In order to utilize the LibSSH plugin, you must first install the ansible-pylibssh python library from PyPI via the following command:

pip install ansible-pylibssh

NOTES:

  • The current PyPI installation method bundles the correct version of LibSSH library and its dependencies as platform-specific wheels that don't rely on any OS-level libraries in runtime.
  • Future plans include creation, publishing, and maintenance of stand-alone RPM and DEB packages for the ansible-pylibssh library that can be installed with well-known Linux package managers. These will install the required system libssh version and its dependencies on the control node. FYI, Red Hat Enterprise Linux 8.1 and later contains the proper libssh package version and its dependencies.
  • The current primary use case for using LibSSH with Ansible is for connecting to network devices. Connecting to other types of endpoints (such as Linux) will be officially enabled at a later date.

Using LibSSH in Ansible Playbooks

Method 1:  The ssh_type configuration parameter can be set to use libssh in the active ansible.cfg file of your project as shown below:

[persistent_connection]
ssh_type = libssh

Method 2:  Set the ANSIBLE_NETWORK_CLI_SSH_TYPE environment variable as shown below:

$export ANSIBLE_NETWORK_CLI_SSH_TYPE=libssh

Method 3:  Set the ansible_network_cli_ssh_type parameter to libssh within your playbook at the play level (as shown in below example).

NOTE: This setting can be made at the individual task level, but only if the connection to the remote network device is not already established. That is, if the first task uses paramiko, then all subsequent tasks in the play must use paramiko even if libssh is specified in any subsequent tasks.

Troubleshooting LibSSH Connections

To quickly verify the libssh transport is set correctly, you can run the below playbook using the ansible-playbook command line with verbose flag (-vvvv) added. Before running, ensure the inventory file is set correctly.

This example playbook uses the cisco.ios Collection and must first be installed from Ansible Galaxy or Ansible Automation Platform on your Ansible control node.

- hosts: "changeme"
  gather_facts: no
  connection: ansible.netcommon.network_cli
  vars:
    ansible_network_os: cisco.ios.ios
    ansible_user: "changeme"
    ansible_password: "changeme"
    ansible_network_cli_ssh_type: libssh
  tasks:
  - name: run show version command
    ansible.netcommon.cli_command:
      command: show version

  - name: run show interface command
    ansible.netcommon.cli_command:
       command: show interfaces

https://gist.github.com/ganeshrn/78149adca85c809b69ed1b5f5262844c

In the output verbose logs, you should see the line "ssh type is set to libssh" displayed on the console, which confirms the configuration is set correctly.

Next Steps and Resources

  • Start testing your Ansible network playbooks by setting the configuration to use the ansible-pylibssh library.
  • Help with performance profiling of your existing playbook of  ansible-pylibssh library with respect to paramiko library.
  • Get involved with the ansible-pylibssh project (https://github.com/ansible/pylibssh)


Automating Helm using Ansible

Automating Helm using Ansible

Increasing business demands are driving the need for increased automation to support rapid, yet stable, and reliable deployments of applications and supporting infrastructure. Kubernetes and cloud-native technologies are no different. For the Kubernetes platform, Helm is the standard means of packaging, configuring and deploying applications and services onto any cluster.

We recently released the kubernetes.core 1.1, our first Red Hat Certified Content Collection release, for general use. A big part of the new content that has been introduced is support for automating Helm operations. In this blog post, I will show you some common scenarios for its use in your automation.

Please note that prior to the release of kubernetes.core 1.1, its contents were released as community.kubernetes. With this content becoming Red Hat support and certified content, a name change was in order. We are in the process of making that transition

A Quick Introduction to Helm

Helm is an open source tool used for packaging and deploying applications on Kubernetes. It is often called Kubernetes Package Manager. It is widely adopted by the Kubernetes community and the Cloud Native Computing Foundation (CNCF) graduate project.

Helm simplifies deployment of the applications by abstracting many of the complexities. This enables easier adoption and allows teams to be more productive.

Helm is designed as a Package Manager specifically for Kubernetes. It supports operations like install, remove, upgrade, rollback and downgrade for Kubernetes applications. As you may know, Kubernetes applications can be defined using declarative resource files for different Kubernetes objects like Deployment, Services, ConfigMaps, PersistentVolumeClaims and so on. Distributing and managing Kubernetes applications is difficult. Helm packages all Kubernetes resource files into a format called "Charts". Chart can be considered as the Kubernetes Package. This packaging format contains information about resource files, dependencies information and metadata.

Automating Helm using Ansible

You can automate your Kubernetes infrastructure using Ansible. All Kubernetes modules are now located in the Kubernetes Collection called kubernetes.core. This Collection also contains modules to automate Helm and its related functionalities.

The following is the list of Helm related modules included in the kubernetes.core Collection -

  1. helm - Manages K8S packages with the Helm binary
  2. helm_info - Gather information on Helm packages deployed inside the cluster
  3. helm_plugin - Manage Helm plugins
  4. helm_plugin_info - Gather information about Helm plugins
  5. helm_repository - Manage Helm repositories

Helm modules take advantage of the Helm binary installed on Ansible controllers. This makes helm modules work out of the box and readily available for the users. Unlike the previous helm module, these are  independent of any third party Python libraries. A special thanks to LucasBoisserie for his contributions.

Let us take a look at these modules used in some common scenarios.

Scenario 1 - Adding new Helm Repository

In order to install the Helm Package, you need to have the Helm repository added in your Kubernetes cluster. 

Let us now add a Helm Repository using helm_repository module:

---
- hosts: localhost
  vars:
     helm_chart_url: "https://charts.bitnami.com/bitnami"
  tasks:
      - name: Add helm repo
        kubernetes.core.helm_repository:
            name: bitnami
            repo_url: "{{ helm_chart_url }}"

Here, we are installing a new Helm Chart Repository by specifying URL and name. After running this playbook, you will have Bitnami Chart Repository installed in your environment.

# helm repo list
NAME     URL
stable     https://kubernetes-charts.storage.googleapis.com/
bitnami    https://charts.bitnami.com/bitnami

Scenario 2 - Installing a Helm Chart

Now, we have the Helm repository configured. Let us now install nginx charts from the Bitnami repository.

---
- hosts: localhost
  tasks:
     - name: Install Nginx Chart
       kubernetes.core.helm:
           name: nginx-server
           namespace: testing
           chart_ref: bitnami/nginx

After running this playbook, you can see nginx-server deployment running in your testing environment.

# kubectl -n testing get deploy
NAME            READY   UP-TO-DATE   AVAILABLE   AGE
nginx-server      1/1     1            1           48s

Scenario 3 - Gather information about Helm Chart installed

Gathering information about the Helm Chart is also easy using the helm_info module.

---
- hosts: localhost
  tasks:
     - name: Gather information about nginx-server
       kubernetes.core.helm_info:
            name: nginx-server
            release_namespace: testing

Running this playbook will provide valuable information about the installed chart such as app version, chart version, revision, status and updated date time about the given chart.

Scenario 4 - Install Helm Plugin

Helm allows you to enhance its functionality by providing pluggable architecture. That means users can write plugins to enhance Helm functionality. There is a large number of Helm plugins available. Users can install those plugins depending on their use case and requirements.

Let us now try to install the Helm plugin called helm env. This helm plugin allows users to view the environment variables available to a helm plugin.

---
- hosts: localhost
  tasks:
     - name: Install Helm Plugin
       kubernetes.core.helm_plugin:
           plugin_path: https://github.com/adamreese/helm-env
           state: present
           release_namespace: testing

Scenario 5 - Gather information about Helm plugins

Users can gather information about installed Helm plugins from the given Kubernetes cluster.

---
- hosts: localhost
  tasks:
  - name: Gather Helm plugin info
    kubernetes.core.helm_plugin_info:
        release_namespace: testing
    register: r

  - name: Print plugin version
    debug:
    msg: "{{ ( r.plugin_list | selectattr('name', 'equalto', plugin_name) | list )[0].version }}"
    vars:
    plugin_name: "env"

This will output all the information related to plugins from the given namespace. Users can specify a particular plugin name to gather its information.

Conclusion & Next Steps

There you have it. With the Helm modules in kubernetes.core, you can easily automate the management of Kubernetes applications in a repeatable and reliable way. We hope you try it and let us know what you think. Please stop by at the Ansible Kubernetes IRC channel 

ansible-kubernetes on Freenode to

provide your valuable feedback or if you need assistance with kubernetes.core Collection.

In a future post, we'll cover the rest of what's new in kubernetes.core and introduce the community.okd (OpenShift) Collection we are currently developing.