We want to hear from you! Help us gain insights into the state of the Ansible ecosystem.
Take the Ansible Project Survey 2024

Enable self-healing applications with Ansible and Dynatrace

Enable self-healing applications with Ansible and Dynatrace

The size, complexity and high rate of change in today's IT environments can be overwhelming. Enabling the performance and availability of these modern microservice environments is a constant challenge for IT organizations.

One trend contributing to this rate of change is the adoption of IT automation for provisioning, configuration management and ongoing operations. For this blog, we want to highlight the repeatable and consistent outcomes allowed by IT automation, and explore what is possible when Ansible automation is extended to the application monitoring platform Dynatrace.

Monitoring Today

Considering the size, complexity and high rate of change in today\'s IT environments, traditional methods of monitoring application performance and availability are often necessary and commonplace in most operations teams. Application performance monitoring (APM) platforms are used to detect bottlenecks and problems that can impact the experience of your customers.

Monitoring alone, however, isn't always enough to help keep your applications running at peak performance. When issues are detected, APM platforms are designed to alert the operator of the problem and its root-cause. The Ops team can then agree on a corrective action, and implement this action against the impacted systems.

What if common or time-consuming corrective actions could be automated?

Dynatrace Automates Remediation

The Dynatrace APM platform provides AI-powered, full stack performance monitoring of your microservice environments and its underlying infrastructure. Dynatrace enables insights into your IT operation and detects if areas of your environment do not meet performance or error rate thresholds by an automated baselining.

Once Dynatrace detects abnormal system behavior that affects real users, a problem alert is created that groups all incidents that share the same root-cause.

Demo application triggers a Problem alert. Dynatrace detected a degradation in response time, impacting 54 real users and more than 300 service calls:
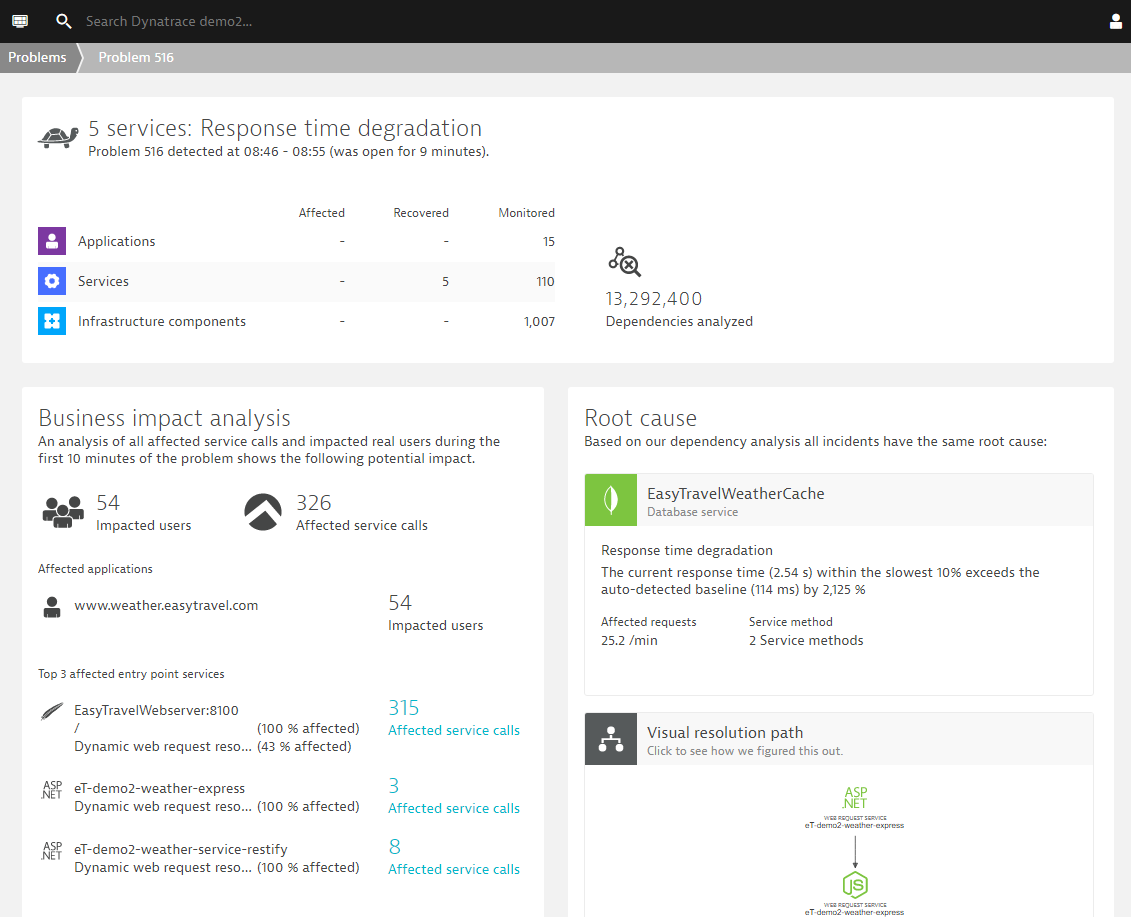
Dynatrace Problem Alert

As soon as Dynatrace detects a problem within an environment, a problem notification can be sent out to third party systems to notify them about the incidents. Dynatrace allows users to integrate with Ansible Tower as a Notification System, allowing operators to launch Ansible Tower job templates from Dynatrace Problem Notifications.

Ansible Tower is now available as a featured third-party integration within the Dynatrace Notification System:
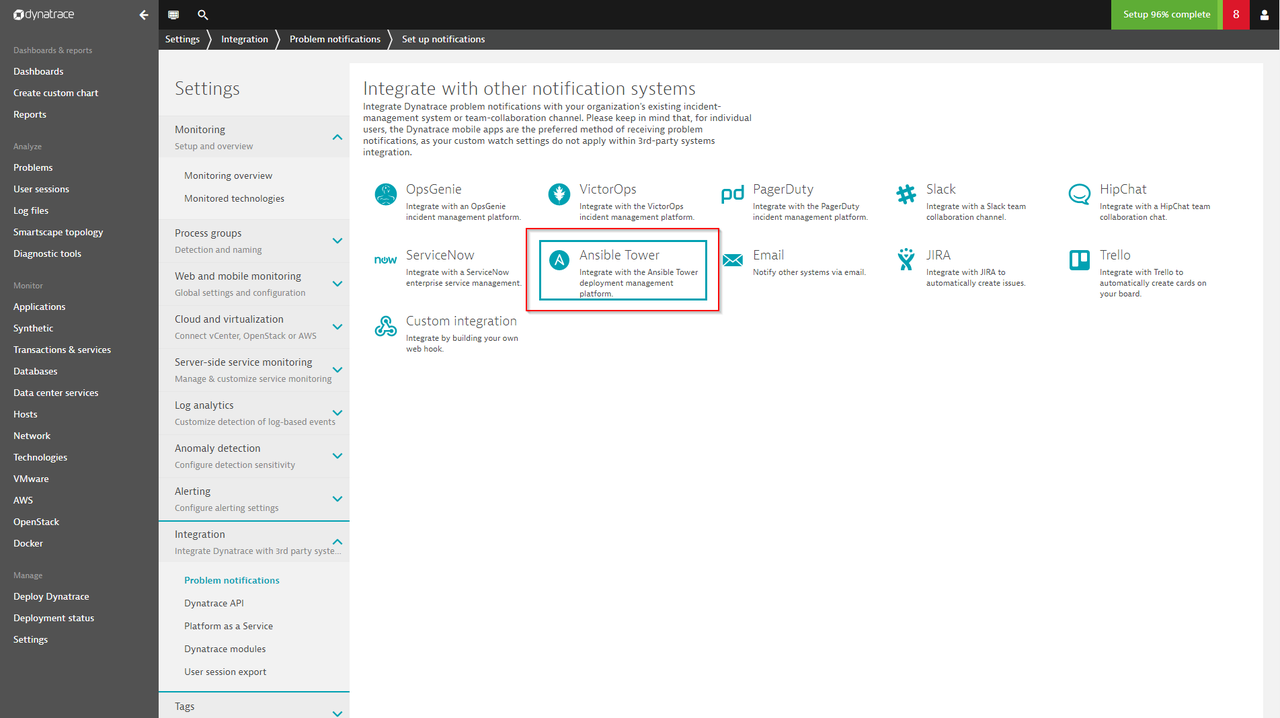
Ansible Tower integration with Dynatrace

The integration also allows transferring contextual information for the detected problem. This means Ansible job templates can leverage these extra variables for a context-aware, finer grained remediation in terms of executing a predefined playbook. 

Specify the Ansible Tower job template URL, credentials and an optional custom message. The Notification can be saved and will be triggered as soon as Dynatrace detects a problem in your environment:
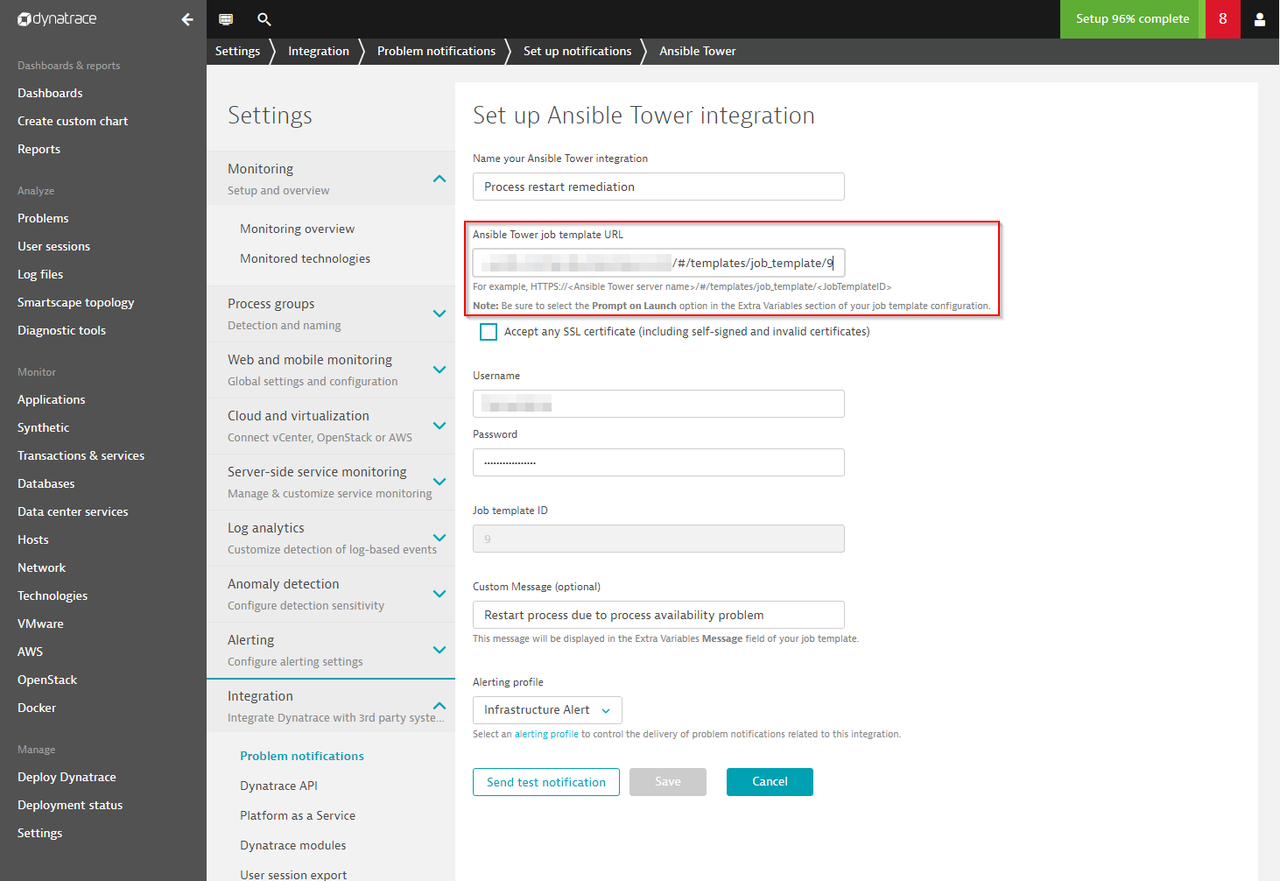
Ansible Tower job template

Execution of a job template triggered by the Dynatrace problem notification sent to\ Ansible Tower:
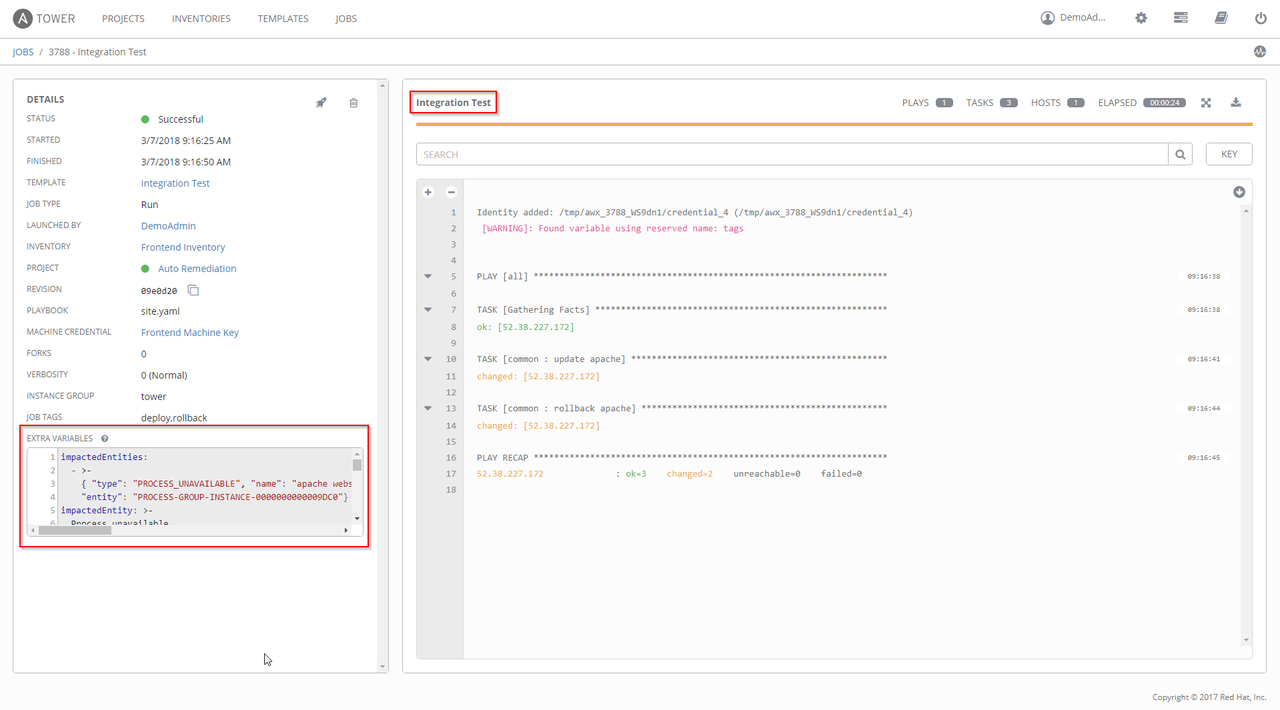
Dynatrace executes Ansible Tower job

Note that extra variables are passed with the job template, designed to eliminate the need for the operator to provide this contextual information.

Self-Healing Applications in Action

Once your Ansible job templates are in place and customized for facilitating remediation tasks and the integration within Dynatrace is set up, the workflow for your self-healing applications looks as follows:

  • Dynatrace monitors your environment and detects problems once they affect real users
  • Dynatrace sends a problem notification to Ansible Tower
  • Ansible Tower launches the specified job template to start the remediation
  • Once the problem is resolved, Dynatrace closes the problem

As you can see, the Dynatrace - Ansible Tower integration is designed to simplify the setup of IT management automation tasks. Furthermore, the integration of Ansible Tower into the Dynatrace Problem Notifications workflow enables self-healing applications by triggering pre-defined, automatable Ansible job templates that are executed by Ansible Tower each time a problem is detected.


Getting Started with Ansible Tower's API

Getting Started with Ansible Tower's API

Welcome to another entry in the Getting Started series. The API (Application Programming Interface) or, as I like to refer to it, the Magical Land of Automation Information, can be used in quite a few ways. In this Getting Started post, we will be discussing Red Hat Ansible Tower's API and how you can use it to extract information to utilize in your playbooks and other tools.

The idea for this blog post came about when David Federlein was developing a new Ansible Tower demo and presentation. I will be making references to that codebase, which you can follow along with throughout this post. Please note that this demo utilizes Vagrant and VirtualBox so you'll need to have those applications installed if you would like to stand up the demo yourself.

Ansible Tower's API

Ansible Tower's API is fully browsable. You can navigate to your instance's REST API by typing this into your browser: http://<Tower server name>/api/v2. Once there, you can click any of the listed links and view the current objects loaded for that particular attribute in Ansible Tower. Everything you can do in Ansible Tower's UI can be done from the API; you can also use it to view everything from credentials to users. As we'll review in the next section, you can manually post to the API or make calls through a playbook.

Posting to the API

There are many different ways that you can make calls to the API, but today we are going to focus on two of the most basic:

  1. Manually from the REST API interface of Ansible Tower
  2. From a playbook

What I mean by "basic" here is that these methods are done only through Ansible Tower. As most of you might know, you can do some pretty amazing stuff with the information from Ansible Tower with other applications.

We'll not only be able to configure and modify Ansible Tower via these methods, but we'll also demonstrate that you can kick off jobs via API call as well. This will allow tighter integration with other aspects of your enterprise infrastructure and give the ability to run Red Hat Ansible Engine workloads while still restrained by the role-based access controls configured around those resources and Job Templates.

Posting Manually

For starters, the easiest (albeit not the quickest or most automated) way to post to the API is from the API interface. Here you can select an object to post to. Each object has a template at the bottom of the page that displays the fields that can be contained in a post.

For example, let's say you want to add a project to your Ansible Tower instance via the API. All you would have to do is navigate to your Ansible Tower's API screen (https://<towerip>/api/v2) select the project URL (/api/v2/projects/) and then scroll down to the bottom. Displayed there will be the content, which will look like this:

{
    "name": "",
    "description": "",
    "local_path": "",
    "scm_type": "",
    "scm_url": "",
    "scm_branch": "",
    "scm_clean": false,
    "scm_delete_on_update": false,
    "credential": null,
    "timeout": 0,
    "organization": null,
    "scm_update_on_launch": false,
    "scm_update_cache_timeout": 0
}

Once you have that content, fill in the quotes with the relative information from your environment. After you paste it into your field, hit POST. If that posted successfully, you can view the project in the Ansible Tower UI and also through the API.

If it failed, you will receive a notification of a bad request. The method for fixing the error will show up in quotes below it. For example, if you are creating a user and fail to enter a password for that user, it will fail and return the following error:

{
    "password": [
        "This field may not be blank."
    ]
}

If you run into any issues with making a post to the API (like the above error), the OPTIONS button found at the top right of the UI next to GET can be of great help. The OPTIONS button describes the acceptable values for POST, PUT and PATCH for the specific object or endpoint you are wishing to post to.

Once the error you have found is fixed in the content field, hit "Post" one more time and note that the object has now been added to Ansible Tower successfully.

Posting Via a Playbook

Another way to post to Ansible Tower's API is through a playbook. The GitHub repo that I linked earlier in the post does this throughout the post installation plays. Almost everything done after the installation is done through the API.

To see it in action, let's sync that project that you just added into your instance. This will require some prior knowledge on the construction of Ansible Playbooks. If you need help or want to brush up on your playbook knowledge, you can visit our documentation.

The play that kicks off the job sync utilizes the URI module within Ansible. This module is used to interact with web services, such as the Ansible Tower API. This exact play can be found in the codebase that I linked above at /roles/tower/main.yml.

- name: kick off project sync
  uri:
    url:  https://localhost/api/v1/projects/7/update/
    method: POST
    user: admin
    password: "{{ towerpass }}"
    validate_certs: False
    status_code:
      - 200
      - 201
      - 202
  when: response.status == 201

In this playbook task, we are telling Ansible to navigate to the API URL for your project. In this instance, it's https://localhost/api/v2/projects/7/update/. Notice that the project has a number before update. Projects are assigned a number in Ansible Tower based on the timing of their entry into Ansible Tower. This number can only be found by navigating to the API interface for projects https://<your_ip_here>/api/v2/projects/. Once there, you will need to find the project you wish to sync and then make a post to the update endpoint of that project number. The example does the update on project number 7.

Once you have found the correct project you want to update, you will need to make a post to the update endpoint. In this example, since we are updating project 7, the endpoint is https://localhost/api/v1/projects/7/update/.

For this post to work successfully with the URI module, you will need to also pass the API your user credentials that you log into Tower with. In this example, we are using the default admin user. You can use whichever user that has sufficient access to make such a post.

Kicking Off a Job

Now, the header might seem a little ambiguous. "Jake, kicking off a job isn't that hard in Ansible Tower." This is correct, but for this example, we are going to kick off a job in Ansible Tower from a playbook task, which is yet another thing you can do by making a call to the API. The specific example I am going to reference can be found in the vagrant-common role (/roles/vagrant-common/main.yml).

Now once you get your spectacles out, the task that I am narrowing is found in the example below:

name: kick off the provisioning job template
  shell:  "curl -f -H 'Content-Type: application/json' -XPOST --user
admin:{{ towerpass }}
https://172.16.2.42/api/v2/job_templates/8/launch/ --insecure"
  when: inventory_hostname == 'demovm4'

At first glance, you are seeing the shell module in use, running a curl command to a specific https endpoint. It just so happens that this https endpoint is the API endpoint for launching a specific job template.

That specific job template is assigned a number in Ansible Tower. In order to not have to go digging through the API to find your specific job template endpoint, a quick and easy way to find it is to navigate to the job template that you want to launch via the API. Once there, look at the URL and the number it's assigned to will be there.

Once you find the correct job template, the https endpoint will look something like api/v2/job_templates/8/launch/. Hit that endpoint with a -XPOST in a curl command and you should be cooking with gas.


Infoblox Integration in Ansible 2.5

Infoblox Integration in Ansible 2.5

The Ansible 2.5 open source project release includes the following Infoblox Network Identity Operating System (NIOS) enablement:

  • Five modules
  • A lookup plugin (for querying Infoblox NIOS objects)
  • A dynamic inventory script

For network professionals, this means that existing networking Ansible Playbooks can utilize existing Infoblox infrastructure for IP Address Management (IPAM), using Infoblox for tracking inventory and more. For more information on Infoblox terminology, documentation and examples, refer to the Infoblox website

Let's elaborate on each of these Ansible 2.5 additions. All of the following examples (and many more) are provided in the network automation community project, under the infoblox_ansible GitHub repository. The integrations for Ansible require that the control node (where Ansible is being executed from) have the infoblox-client installed. It can be found here and installed with pip issuing the pip install infoblox-client command.

Ansible Infoblox Modules

There are five new modules included with Ansible 2.5. They can be currently found in the development branch of the documentation:

Here is an example playbook on configuring a IPv4 network using the nios_network module:

---
- hosts: localhost
  connection: local
  tasks:
    - name: set dhcp options for a network
      nios_network:
        network: 192.168.100.0/24
        comment: sean put a comment here
        options:
          - name: domain-name
            value: ansible.com
        state: present
        provider: "{{nios_provider}}"

Since this playbook did not specify the network_view parameter it will default to the default view. To run the playbook use the ansible-playbook command:

SEANs-MacBook-Pro:infoblox_ansible sean$ ansible-playbook  configure_network.yml

PLAY [localhost] ***************************************************************************************

TASK [set dhcp options for a network] ***************************************************************
changed: [localhost]

PLAY RECAP ******************************************************************************************
localhost                  : ok=1    changed=1    unreachable=0    failed=0

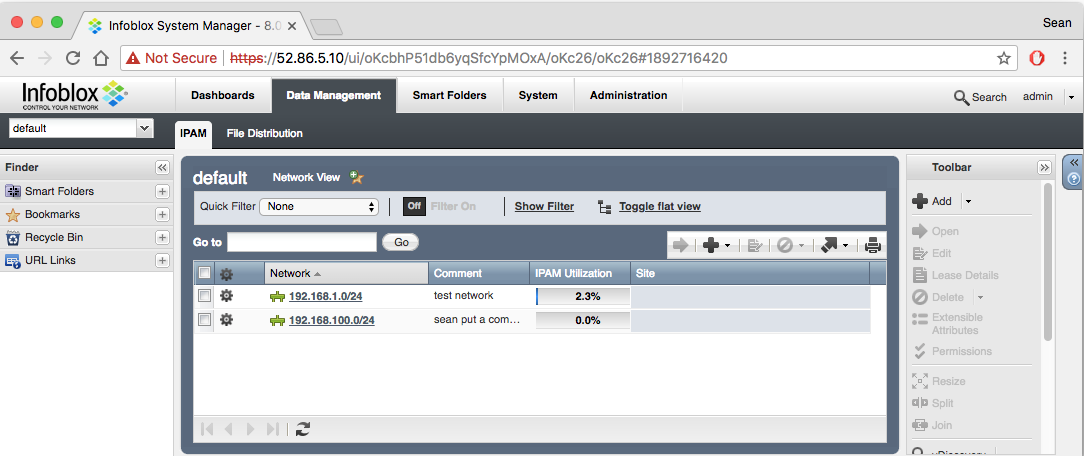
We can login to the web https GUI website and look under Data Management -> IPAM where we will see the new network listed:

Ansible-Infoblox-Image-1

The modules can keep state (where applicable) so when we re-run the playbook instead of saying changed it will just say OK and not perform any changes to Infoblox. This is also referred to as idempotency (referred to in the Ansible Docs glossary).

SEANs-MacBook-Pro:infoblox_ansible sean$ ansible-playbook  configure_network.yml

PLAY [localhost] ***************************************************************************************

TASK [set dhcp options for a network] ***************************************************************
ok: [localhost]

PLAY RECAP ******************************************************************************************
localhost                  : ok=1    changed=0    unreachable=0    failed=0

Ansible Infoblox Lookup Plugin

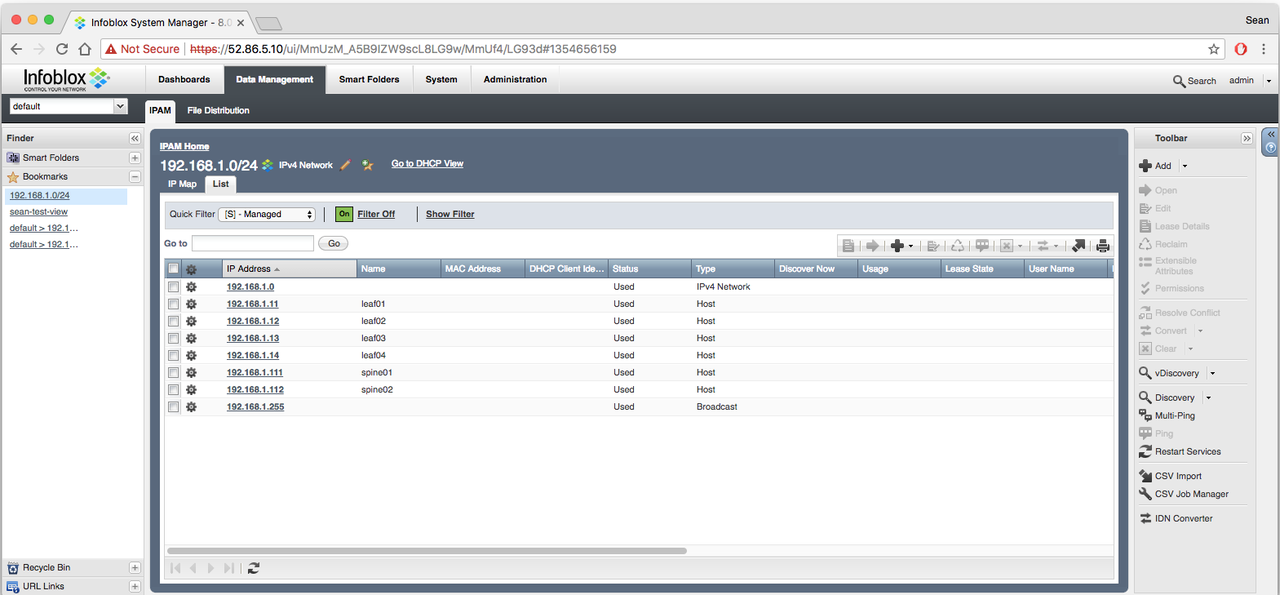
Next let's look at the new lookup plugin for Infoblox. The Ansible documentation for the lookup plugin can be found here. The lookup plugin allows us to query different InfoBlox NIOS objects, such as network views, dns views, host records, and more. In my Infoblox IPAM tab (Data Management->IPAM) I have four top of rack leaf switches, and two spine switches defined. I can see them under the list view for managed nodes:

Ansible-Infoblox-Image-2

Let's look at an Ansible Playbook snippet focused on grabbing information about a host record:

 - name: fetch host leaf01
      set_fact:
        host: "{{ lookup('nios', 'record:host', filter={'name': 'leaf01'}, provider=nios_provider) }}"

We will set the result of the lookup plugin (specified by the keyword nios above) to the variable host. We only want the information for leaf01, so we will filter based on the name. For the full playbook checkout the get_host_record.yml stored on the network automation community.

Run the playbook with the ansible-playbook command:

SEANs-MacBook-Pro:infoblox_ansible sean$ ansible-playbook get_host_record.yml

PLAY [localhost] ***************************************************************************************

TASK [fetch host leaf01] ******************************************************************************
ok: [localhost]

TASK [check the leaf01 return variable] *************************************************************
ok: [localhost] => {
<SNIPPET, REST OF OUTPUT REMOVED FOR BREVITY>
    "host": {
        "ipv4addrs": [
            {
                "configure_for_dhcp": false,
                "host": "leaf01",
                "ipv4addr": "192.168.1.11"
            }
        ],
    }
}

TASK [debug specific variable (ipv4 address)] ******************************************************
ok: [localhost] => {
    "host.ipv4addrs[0].ipv4addr": "192.168.1.11"
}

TASK [fetch host leaf02] ******************************************************************************
ok: [localhost]

TASK [check the leaf02 return variable] *************************************************************
ok: [localhost] => {
<SNIPPET, REST OF OUTPUT REMOVED FOR BREVITY>

    "host": {
        "ipv4addrs": [
            {
                "configure_for_dhcp": false,
                "host": "leaf02",
                "ipv4addr": "192.168.1.12"
            }
        ],
    }
}

PLAY RECAP ******************************************************************************************
localhost                  : ok=5    changed=0    unreachable=0    failed=0

The above playbook shows us how we can query Infoblox to grab specific information about Infoblox objects (in this case, specific hosts). These facts can be used through an Ansible play and allow Infoblox to act as a single source of truth for information that may be changing. While the Ansible modules allow you to configure Infoblox, the lookup plugin allows you to grab information from Infoblox to use in subsequent tasks. To read more about Ansible variables, facts and the set_fact module, refer to the Ansible variables documentation.

Ansible Infoblox Dynamic Inventory

Ansible dynamic inventory scripts allow import of inventory from another source like Cobbler, AWS or in this case Infoblox NIOS. You can read more about dynamic inventory on the Ansible dynamic inventory documentation page.

There are two files that need to be located under the contrib/inventory/ in the Ansible project:

  • infoblox.yaml - specifies the provider arguments and optional filters
  • infoblox.py - python script that retrieves inventory

Update the infoblox.yaml with your login information to the NIOS instance. This includes the username, password and an IP address or hostname. Make sure the infoblox.yaml file is located in /etc/ansible/infoblox.yaml.

To test your setup the python script infoblox.py can be run by executing python infoblox.py on the command line:

[ec2-user@ip-172-16-103-218 infoblox]$ python infoblox.py
{
    " ": {
        "hosts": [
            "leaf01",
            "leaf02",
            "leaf03",
            "leaf04",
            "spine01",
            "spine02"
        ]
    },
<SNIPPET, REST OF OUTPUT REMOVED FOR BREVITY>

For this playbook we will create a small debug playbook to print out the inventory_hostname for each host we grab using the infoblox python dynamic inventory script.

---
- hosts: all
  gather_facts: false
  tasks:
    - name: list all hosts
      debug:
      var: inventory_hostname
      delegate_to: localhost

To grab the inventory for a playbook use the -i parameter and specify the infoblox.py python script. Run the playbook with the ansible-playbook command:

[sean@rhel-7]$  ansible-playbook -i infoblox.py debug.yml

PLAY [all] ***********************************************************************************************

TASK [list all hosts] ************************************************************************************
ok: [leaf01 -> localhost] => {
    "inventory_hostname": "leaf01"
}
ok: [leaf03 -> localhost] => {
    "inventory_hostname": "leaf03"
}
ok: [leaf02 -> localhost] => {
    "inventory_hostname": "leaf02"
}
ok: [leaf04 -> localhost] => {
    "inventory_hostname": "leaf04"
}
ok: [spine01 -> localhost] => {
    "inventory_hostname": "spine01"
}
ok: [spine02 -> localhost] => {
    "inventory_hostname": "spine02"
}

PLAY RECAP ******************************************************************************************
leaf01                       : ok=1    changed=0    unreachable=0    failed=0
leaf02                       : ok=1    changed=0    unreachable=0    failed=0
leaf03                       : ok=1    changed=0    unreachable=0    failed=0
leaf04                       : ok=1    changed=0    unreachable=0    failed=0
spine01                    : ok=1    changed=0    unreachable=0    failed=0
spine02                    : ok=1    changed=0    unreachable=0    failed=0

More Information

For more information on Ansible networking check out the Ansible Networking microsite. Infoblox NIOS can now utilize Ansible Playbook that are already configuring Cisco IOS, NX-OS, IOS-XR, Juniper JunOS, Arista EOS and much more.


Getting Started with LDAP Authentication in Ansible Tower

Getting Started with LDAP Authentication in Ansible Tower

Next in the Getting Started series is covering the basics of configuring Red Hat Ansible Tower to allow users to log in with LDAP credentials. In this post, we'll explain a few troubleshooting tips to help narrow down problems and correct them. As long as you have a map of your LDAP tree/forest, this post should help get users logging in with their LDAP credentials.

CONFIGURATION SETTINGS

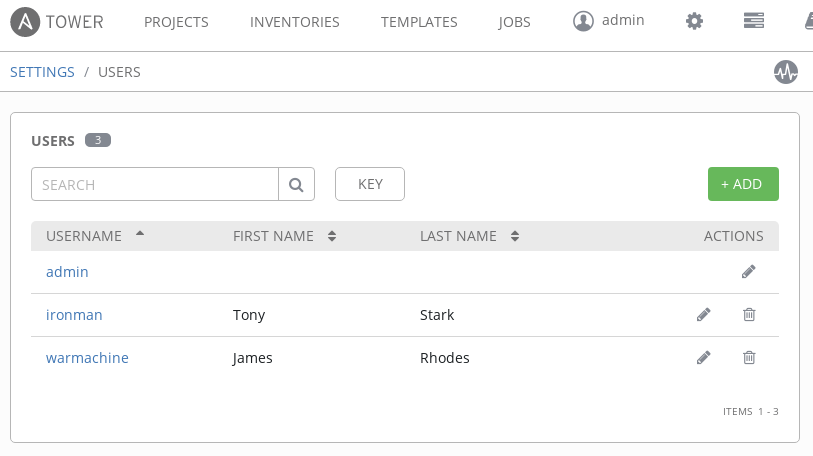
To configure your Ansible Tower for LDAP authentication, navigate to Settings (the gear icon) and to the "Configure Tower" section. The area within these configuration settings we're focusing on is "Authentication", and the sub category should be set to "LDAP".

Ansible-Getting-Started-Tower-LDAP-7

The fields that will be the primary focus are:

  • LDAP server URI
  • Bind DN and password
  • User/group searches

The other fields will allow you to refine your LDAP searches to reduce the resources used in production or map your organization.

The LDAP URI is simply the IP or hostname of your LDAP server prepended with the protocol (ldap://).

Ansible-Getting-Started-Tower-LDAP-8\

The bind DN will be a user credential and password (followed by the group and domain) with access to read the LDAP structure.

Ansible-Getting-Started-Tower-LDAP-1

REFINING USER SEARCH

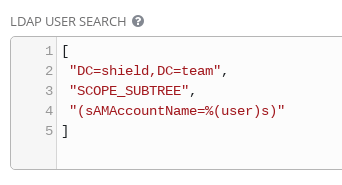
With Ansible Tower able to connect to the LDAP server, refining the user search completes the configuration. The User Search entry will match the pattern specified by location and scope. In this case the user ID is the sAMAccountName value (instead of uid) since the search is against an Active Directory tree.

Ansible-Getting-Started-Tower-LDAP-4Ansible-Getting-Started-Tower-LDAP-2

USER AND GROUP SEARCH

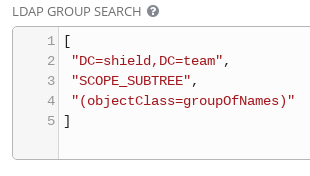
The User and Group searches are where the most troubleshooting might have to be done, depending on how complex your directory structure is. Use the ldapsearch tool from the openldap package to construct searches against the LDAP server. Begin with a basic search and dive incrementally to refine your searches.

ldapsearch -x  -H ldap://10.10.10.254 -D "CN=jarvis,CN=Users,DC=shield,DC=team" -w 01Password! -b "cn=Users,dc=shield,dc=team"

This search is general and will list results in the location specified (-b "cn=Users,dc=shield,dc=team") with the location matching what you would use for your LDAP search scope against your server.

The LDAP Require Group and LDAP Deny Group fields are for adding single entries to narrow your search scope by a single group. The LDAP User DN Template field will narrow down the scope to just the format you enter in the field. In the LDAP User Search field within the configuration page use:

  • SCOPE_SUBTREE: to search recursively down the directory tree
  • SCOPE_ONELEVEL: to specify a search one level down the tree only
  • SCOPE_BASE: to only search the level specified in the base DN

Use the results returned from the LDAP search tool to choose the values to search by, for example: uid or sAMAccountName & group or groupOfNames. It's worth keeping in mind that LDAP User DN Template will supercede your LDAP User Search, so only use one or the other when setting it up.

Ansible-Getting-Started-Tower-LDAP-6

For Windows/AD Admins

These steps set up a single-sign-on to Ansible Tower for logging in LDAP users. Configuration of Ansible Tower to authenticate against LDAP-connected hosts would be done in the Credentials section, and the same considerations will apply to authentication against Windows hosts that apply to Ansible.Considerations include prepping WinRM on the hosts to accept connections. Before preparing and running jobs against Windows hosts in an Active Directory, make sure to have the Credentials set up appropriately!

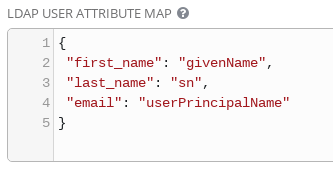
USER ATTRIBUTE MAP

Finally, it's important to dedicate some time when testing LDAP authentication to attribute user and organization mapping. The LDAP User Attribute Map is where the LDAP attributes are mapped to Ansible Tower attributes. Examples include first name, last name, email, etc. In this case the email attribute is mapping to the [userPrincipalName] in the Active Directory Server being used. The default is "mail" for most LDAP layouts, but you will need to know your structure in order to map accordingly.

Ansible-Getting-Started-Tower-LDAP-5

The LDAP User Flags By Group field can be used to quickly narrow down mapping. For example, users belonging to the OU named "secret" are mapped to the superusers group in Ansible Tower in the example below:

Ansible-Getting-Started-Tower-LDAP-3

More complex mapping will get equally more complex when mapping to teams and organizations in Ansible Tower. The example being used has a single organization with org admins defined as the OU named "secret" that was matched in User Flags By Group.

{
 "Shield": {
  "admins": [
   "ou=secret,dc=shield,dc=team"
  ],
  "remove_admins": false,
  "remove_users": false,
  "users": true
 }
}

Users are assigned teams using the LDAP Team Map field. The simple LDAP database in the example below is mapping two groups to two respective teams within the same organization.

{
 "secret": {
  "organization": "Shield",
  "users": "OU=secret,DC=shield,DC=team",
  "remove": false
 },
 "avengers": {
  "organization": "Shield",
  "users": "OU=avengers,DC=shield,DC=team",
  "remove": false
 }
}

Mapping users and groups to Ansible Tower will vary in difficulty based on the LDAP database layout. Use the LDAP search command to refine your group queries and match them accordingly in Ansible Tower.

Recap

  • To authenticate LDAP users logging into Ansible Tower, use: LDAP server URI, bind DN & password and user and group search
  • Using LDAP User DN Template overrides the User Search
  • Use LDAP Require Group and/or LDAP Deny Group to reduce the number of groups searched by Ansible Tower
  • LDAP User attributes in Ansible Tower are defined in LDAP User Attribute Map
  • Use LDAP User Flags By Group to set LDAP user flags in Ansible Tower
  • Groups in LDAP are mapped to organizations or teams in LDAP Organization Map and LDAP Team Map, respectively


Adding Proxy Support within Red Hat Ansible Tower

Adding Proxy Support within Red Hat Ansible Tower

Getting Started with Adding Proxy Support

There are many reasons why proxies are implemented into an environment. Some can be put in place for security, others as load balancers for your systems. No matter the use, if you have a proxy in place, Red Hat Ansible Tower may need to utilize it. For a more in-depth look at what we will be doing in this post, you can visit our docs specifically on Proxy Support within Ansible Tower here.

Adding a Load Balancer (Reverse Proxy)

In some instances, you might have Ansible Tower behind a load balancer and need that information added to your instance. Sessions in Ansible Tower associate an IP address upon creation, and Ansible Tower's policy requires that any use of the session match the original IP address.

To allow for support of a proxy, you will have to make a few changes to your Ansible Tower configuration. Previously, this would have been done in a settings.py file found on your Ansible Tower host, but as of 3.2 you can now make these changes in the UI. To make these edits, you must be an admin on the instance and navigate to Settings, and then to Ansible Tower configuration.

Once you are in the Ansible Tower Configuration, select the System tab up at the top next to Jobs. Once there, we are going to be making an edit to the Remote Host Headers box. There will already be some text in there that is set after the installation. By default REMOTE_HOST_HEADERS is set to ['REMOTE_ADDR', 'REMOTE_HOST'].

The edit you are going to make should reflect the following line with the relevant information from your organization\'s environment.

REMOTE_HOST_HEADERS = ['HTTP_X_FORWARDED_FOR', 'REMOTE_ADDR', 'REMOTE_HOST']

Once you have entered the relevant information, click the green Save button in the bottom right corner and you'll be all set.

Outbound Proxy

Setting up Ansible Tower to utilize an outbound proxy is quick and easy. One of the things that we see quite often when an outbound proxy needs to be in place is a project sync failing (if you aren't using locally stored playbooks). This error appears when Ansible Tower cannot resolve the source control management (SCM) domain that you are using to manage your versioned playbooks, such as github.com. To fix this issue, you will need to make some configuration changes to Ansible Tower. To do this, navigate to the admin settings (the gear in the top right hand corner) and from there, select Configure Ansible Tower.

Navigate to the Jobs tab that can be found across the top of the page. Once you are inside the Jobs tab, scroll down until you find the extra environment variables.

You will need to enter three line entries to add your proxy to your instance. Please note, you will need to know the server URL to make these changes worth your while.

AWX_TASK_ENV['http_proxy'] = 'http://url:port/'

AWX_TASK_ENV['https_proxy'] = 'http://url:port/'

AWX_TASK_ENV['no_proxy'] = '127.0.0.1,localhost'

Once the information has been entered, select the green Save button in the bottom right hand corner.

Please note, if you are upgrading from a prior release, you may need to remove prior settings from configuration files before using the Ansible Tower interface to configure these settings.

Now you can use Ansible Tower's power to automate while allowing it to utilize your proxy server, ELB or whichever form of filtering you have in place for your environment. It is not a hard process to implement, but does require some prior knowledge about your particular infrastructure.